Rest API service
Prerequisites
It is essential that you have a working and active ticketino.com account and have full access to it. You need to have one to be able to access the API key or for the creation of the authentication token. To register as a TICKETINO user, go to https://accounts.ticketino.com/Account/Login.
Authentication
To use our API, you need to authenticate and authorize first. You can do that in two different ways:
- You can request a Bearer Token from our backend and append it to your Http-Calls. This is the commonly used method.
- You can choose to use our Diffie-Hellman key exchange procedure. In this process instead of having first to transfer the secret key, you can generate your AppId with its corresponding API-Key. This information is only visible for you.
API Authentication – Bearer Token
This authentication system is based upon a bearer token, which needs to be sent in the header of every API interaction. Without the bearer token in the header, you will receive a CORS-Error or a 401 Error. In case you have added a token to your header and still get one of the mentioned errors above; create a new token and append it to the header and try again. It might have happened that the one you were using was cleared or ran out in its lifetime.
The authentication code must be in a section of your application that is not exposed to the client (e.g. browser). The same applies for the bearer token. Never expose the generated bearer token to a client.
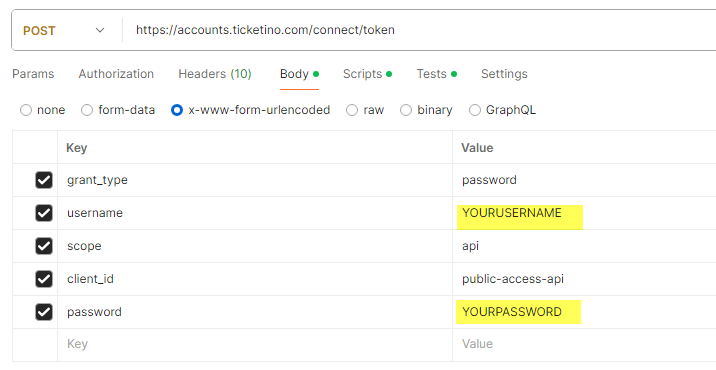
You need the following information to get a bearer token:
- User-Name: your TICKETINO user name, usually an e-mail address
- Password: the password that you have chosen
- Grant Type: password
- Client ID: public-access-api
- Scope: api
Example: Postman
Example: C#
API Authentication – API-key
Before you start, you need to create the APP-ID and the APP-Key. Please proceed as follows:
- Login to your account: https://cockpit.ticketino.com/
- Go to page https://cockpit.ticketino.com/de/APIKeys
- Select 'Create new API key'
- Copy the generated key pair
To make sure that you deliver the correct information within the header of the API-call, we have broken down what needs to be contained within the headers.
The header is expected to have 2 attributes, one is a timestamp the other is a string which gets filled by with determined information. The authorization-timestamp is very self-explanatory, this attribute gets filled with the timestamp when the http-call gets executed, meanwhile the authorization attribute is a bit more complex.
The header-attribute is expected to have a this structure: “TicketinoAPI {appId}:{base64Signature}:{nonce}”
The signature is expected to be given in its encoded state in base64. The signature itself is not a predetermined signature but one which needs to get coded by hand. We advise you to create the signature in the C# part of your project. Within the C# code we are using the string.Format() method, there we fill the string with the expected layout as well as hand over the needed variables to be filled in.
For the string format we have defined "{0}\n{1}\n{2}\n{3}\n{4}\n{5}" and after said attribute we fill it with the needed variables.
The expected variables are as follow; the order of attributes needs to be the same:
- AppId
- RequestHttpMethod
- RequestUri (including the parameters, excluding baseUrl, all in small letters)
- RequestTimeStamp
- Nonce
After having created the string, we expect you to encode the newly crated string into a UTF-8-Bytes, we also do the same with the API-key, the one that is connected to your AppId. Beware this is the secret key for the hashing. Therefore, take care in how and where you store the key in case this key gets out or gets used by someone else besides you immediately delete your corresponding AppId and API-key in the cockpit.
After having encoded your signature and secret-key we create a “HMACSHA256” object with secret-key-bytes as an attribute in the constructor. Afterwards we can hash our signature with the newly created HASH. After that we convert the newly hashed signature to a base64String, and this is our final signature string which gets appended in the header attribute.
The route of the controller needs to be same excluding the domain, so that the requestURI gives back the same answer for you end as well as our end. In case you don't want to do that you can always change the controller to expect a string from the frontend where it hands over the requestURI in the needed format.
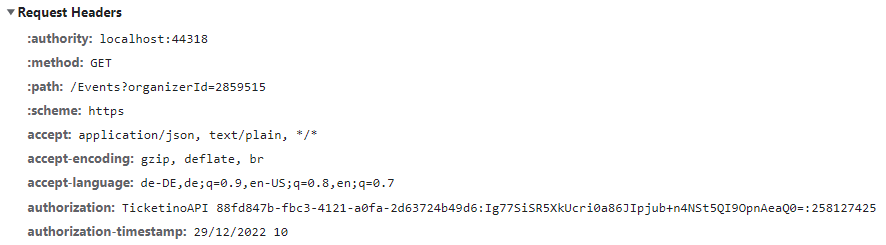
Example of the expected header request